LINE6 DT-50 Series Amplifiers
MDP2 users: go to this page for latest layout!!!!
Version change (2015-11-26)
Use of "named ticks" instead of relying on sub/super controls. Less controls, same power!!!
Note: Voicing controls on both AMP channels share the same MIDI CC (122). Channel "A" uses values 0 to 3 while Channel "B" uses values 4 to 7. Modifying Channel "A" or Channel "B" Voicing control will automatically change AMP channel from "A" to "B" (and vice-versa). This is not a bug in layout.
I've been using MIDI Designer for some time and with this wonderful tool, I finally found a way to control my LINE6 gears from my iPad without having to spend days trying to understand how the tool works.
Here is layout I've built for LINE6 DT50 series amplifiers. Layout is based on latest release of DT50 Firmware (V 2.0)
Once again, feel free to change control style and labels.
BANK 1: BANK 1 is composed of 2 pages, 1 for channel “A” main controls and 1 for channel “B” main controls.
BANK 2: BANK 2 is composed of 4 pages, 2 for channel “A” and 2 for channel “B”.
- Mode 1:
- Selecting amplifier model automatically sets Cab, Voicing, Negative Feedback loop, Lamp boost level, Amp Class, Tube configuration, Feedback Capacitor and Phase Inversion B+ Voltage to default values sets by LINE6
- Mode 2 (strongly recommended!!!!)
- User selects amplifier model and then selects Cab, Voicing, Negative Feedback loop, Lamp boost level, Amp Class, Tube configuration, Feedback Capacitor and Phase Inversion B+ Voltage.
- I strongly suggest to select NONE for Cabinets selection as DT "onboard" speakers will do the job. Or if, like I did, you connect your DT Amp to 4X12 Eminence Red Coat CAB, there is no way CAB simulation will be as close as "the real thing"!!!!
- One last thing: use MASTER volume in "full blown NORMAL" mode and turn it close to FULL . Control overall volume with Channel Volume instead of MASTER. This way, you will ear the tubes sound instead of modelling: this makes a HUGE difference.
I’m still trying to find a way to be able to use the same “Amplifier Selection Grid” (8X4) and have 2 SUPERCONTROLS attached to a single grid without triggering both SUPERCONTROLS at the same time, which is not a good thingJ. Once I find how to do this, I will be able to remove 2 pages from this layout.
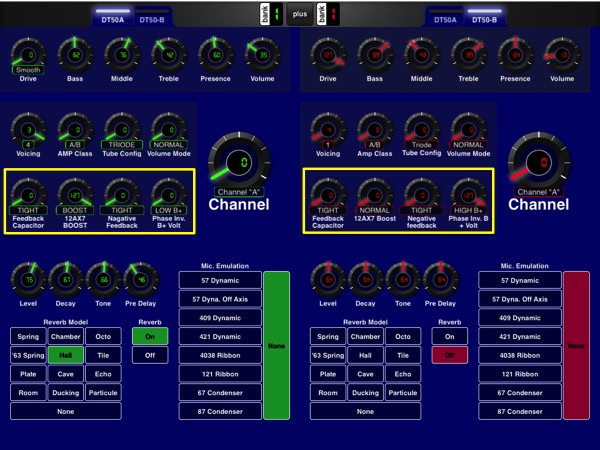
Examples below are based on Channel “A”, channel “B” just looks the same (except for controls color).
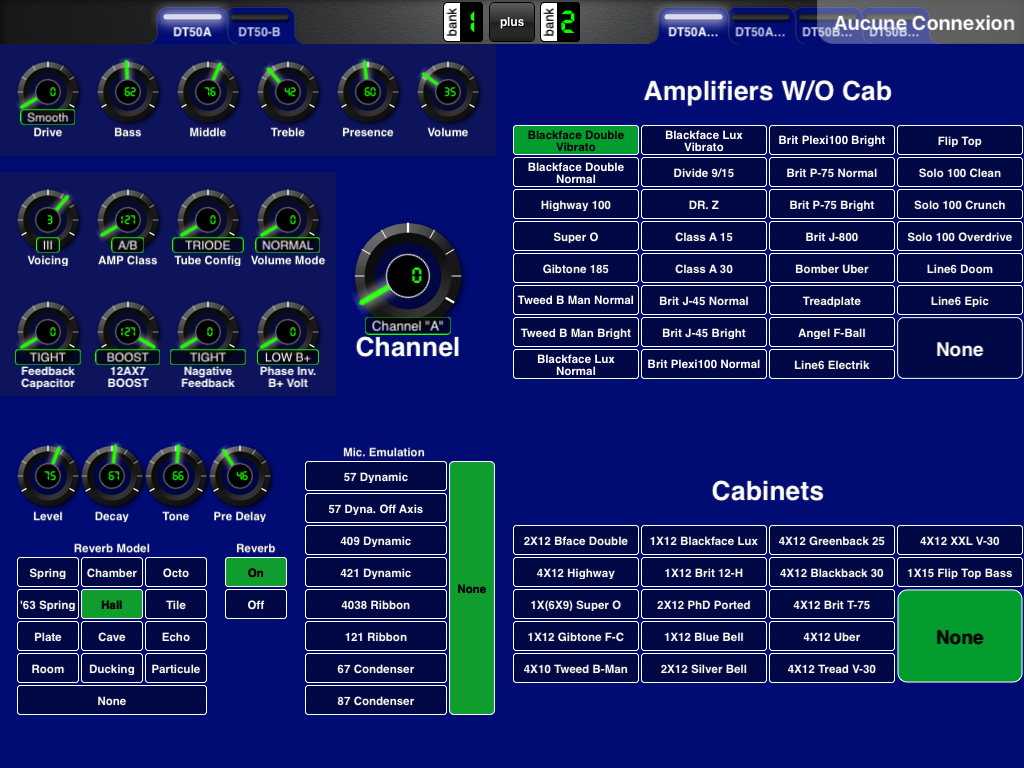
DT50 MAIN controls + Amplifier selection with default cabinets

DT50 MAIN controls + Amplifier selection + Cabinet Selection
DT50 HIDDEN CONTROLS.
Note: Those are not the same as "hidden controls in MIDI Designer" but amplifier parameters tied to VOICING models. DT50 Hidden controls are not supported on DT25 series.
- Some DT50 "hidden controls" can only be changed via MIDI (see image below) as they are not visible on HD500 "on board" configuration window, HD500 Edit or DT50 amplifier itself.
- Hidden controls are tied to Voicing configuration and they can alter, in a some ways voicing models.
- Note that any changes made on those "hidden controls" are saved in DT50 memory.
- If your DT50 does not respond as it should or if you want to go back to initial amplifier setup for “hidden controls”, just reset your amplifier (yes: there is a computer in this amp...) by powering up the amp while holding down "Voicing Button" and holding up "Pentode/Triode Button". Process takes about 15 seconds to terminate.
Make sure to use MIDI channel 1 as DT50 will only listen to MIDI channel 1.
Now enjoy controlling DT-50 with MIDI Designer and your iPad:
Working on Youtube Tutorial for this one: stay tuned.
